Linux 驱动开发入门:从最简单的 hello 驱动到硬件交互
🎉 写给未来的自己和领导:本文是 Linux 驱动开发的 入门级保姆教程,从零开始搭建驱动框架,逐行解释代码,记录每一个踩过的坑。无论你是刚接触内核编程,还是想快速上手 GPIO 中断,都能在这里找到清晰的思路和可复现的步骤。
📚 目录
- 引言:驱动是什么?
- 驱动的基本框架 —— 一切皆文件
- 实战:第一个 hello 驱动
- 3.1 完整的驱动源码(带详细注释)
- 3.2 编译驱动 —— Makefile 解析
- 3.3 上机测试 —— 从 insmod 到读写 /dev/hello
- 3.4 常见错误与解决方法
- 驱动与 APP 的数据传输 —— copy_to/from_user
- 驱动提供能力,不提供策略 —— 四种访问方式
- GPIO 子系统 —— 用编号控制引脚
- 6.1 确定 GPIO 编号的方法
- 6.2 基于 sysfs 操作 GPIO(用户态验证)
- 6.3 GPIO 子系统的内核函数
- 中断处理 —— 让驱动响应硬件事件
- 7.1 中断申请流程
- 7.2 按键驱动框架(含定时器防抖)
- 总结与后续学习建议
1. 引言:驱动是什么?
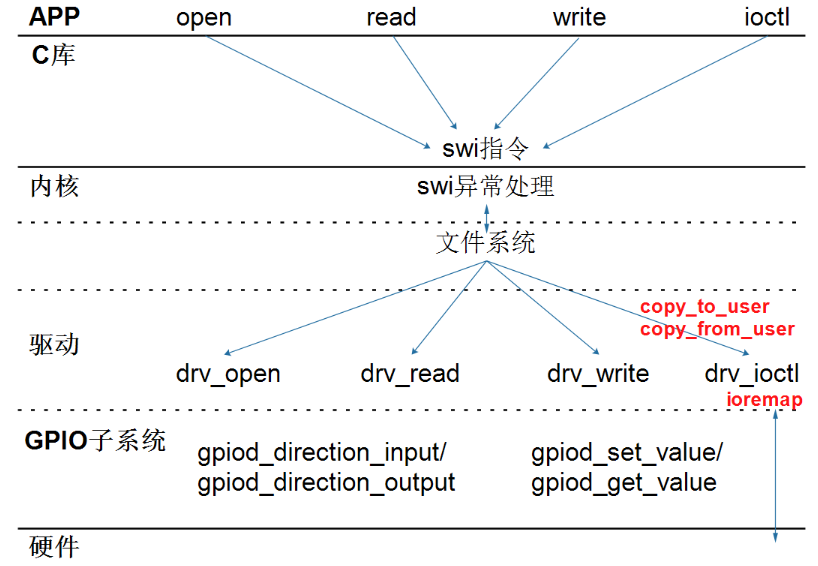
一句话白话:驱动就是 内核中的“翻译官”。APP 说“我要读数据”,驱动把它翻译成硬件能懂的指令(拉高拉低 GPIO、读写寄存器),然后把硬件返回的结果再翻译回 APP 能理解的数据。
生活化类比 🏢:
- APP = 公司老板,只会说“我要营业额”。
- 驱动 = 财务经理,知道怎么查数据库、算报表,最后交给老板一个数字。
- 硬件 = 服务器,只接受底层指令。
在 Linux 中,驱动最终以 .ko(kernel object)文件存在,可以动态加载和卸载。
2. 驱动的基本框架 —— 一切皆文件
Linux 的设计哲学是 “一切皆文件”。硬件设备也被抽象成文件(比如 /dev/hello),APP 使用标准的 open / read / write / ioctl / close 来访问。
2.1 核心结构体 file_operations
这个结构体是一张 函数跳转表,告诉内核:当 APP 对设备文件调用某个系统调用时,应该执行驱动的哪个函数。
c
1static const struct file_operations hello_drv = {
2    .owner   = THIS_MODULE,
3    .open    = hello_open,
4    .read    = hello_read,
5    .write   = hello_write,
6    .release = hello_release,
7};
8
2.2 驱动编写四步曲
- 构造
file_operations:填充分发函数。 - 注册字符设备:
register_chrdev告诉内核这个驱动的主设备号。 - 入口函数:模块加载时执行,完成注册和自动创建设备节点。
- 出口函数:模块卸载时执行,清理资源。
2.3 自动创建设备节点 —— class 和 device
传统方式需要手动 mknod 创建设备节点,太麻烦。现代驱动会这样做:
c
1hello_class = class_create(THIS_MODULE, "hello_class");
2device_create(hello_class, NULL, MKDEV(major, 0), NULL, "hello");
3
class_create在/sys/class下创建一个类。device_create会在/dev下自动生成/dev/hello节点。
3. 实战:第一个 hello 驱动
我们的目标是:写一个驱动,提供一个 /dev/hello 设备,APP 可以向它写入字符串,再读出来。
3.1 步骤
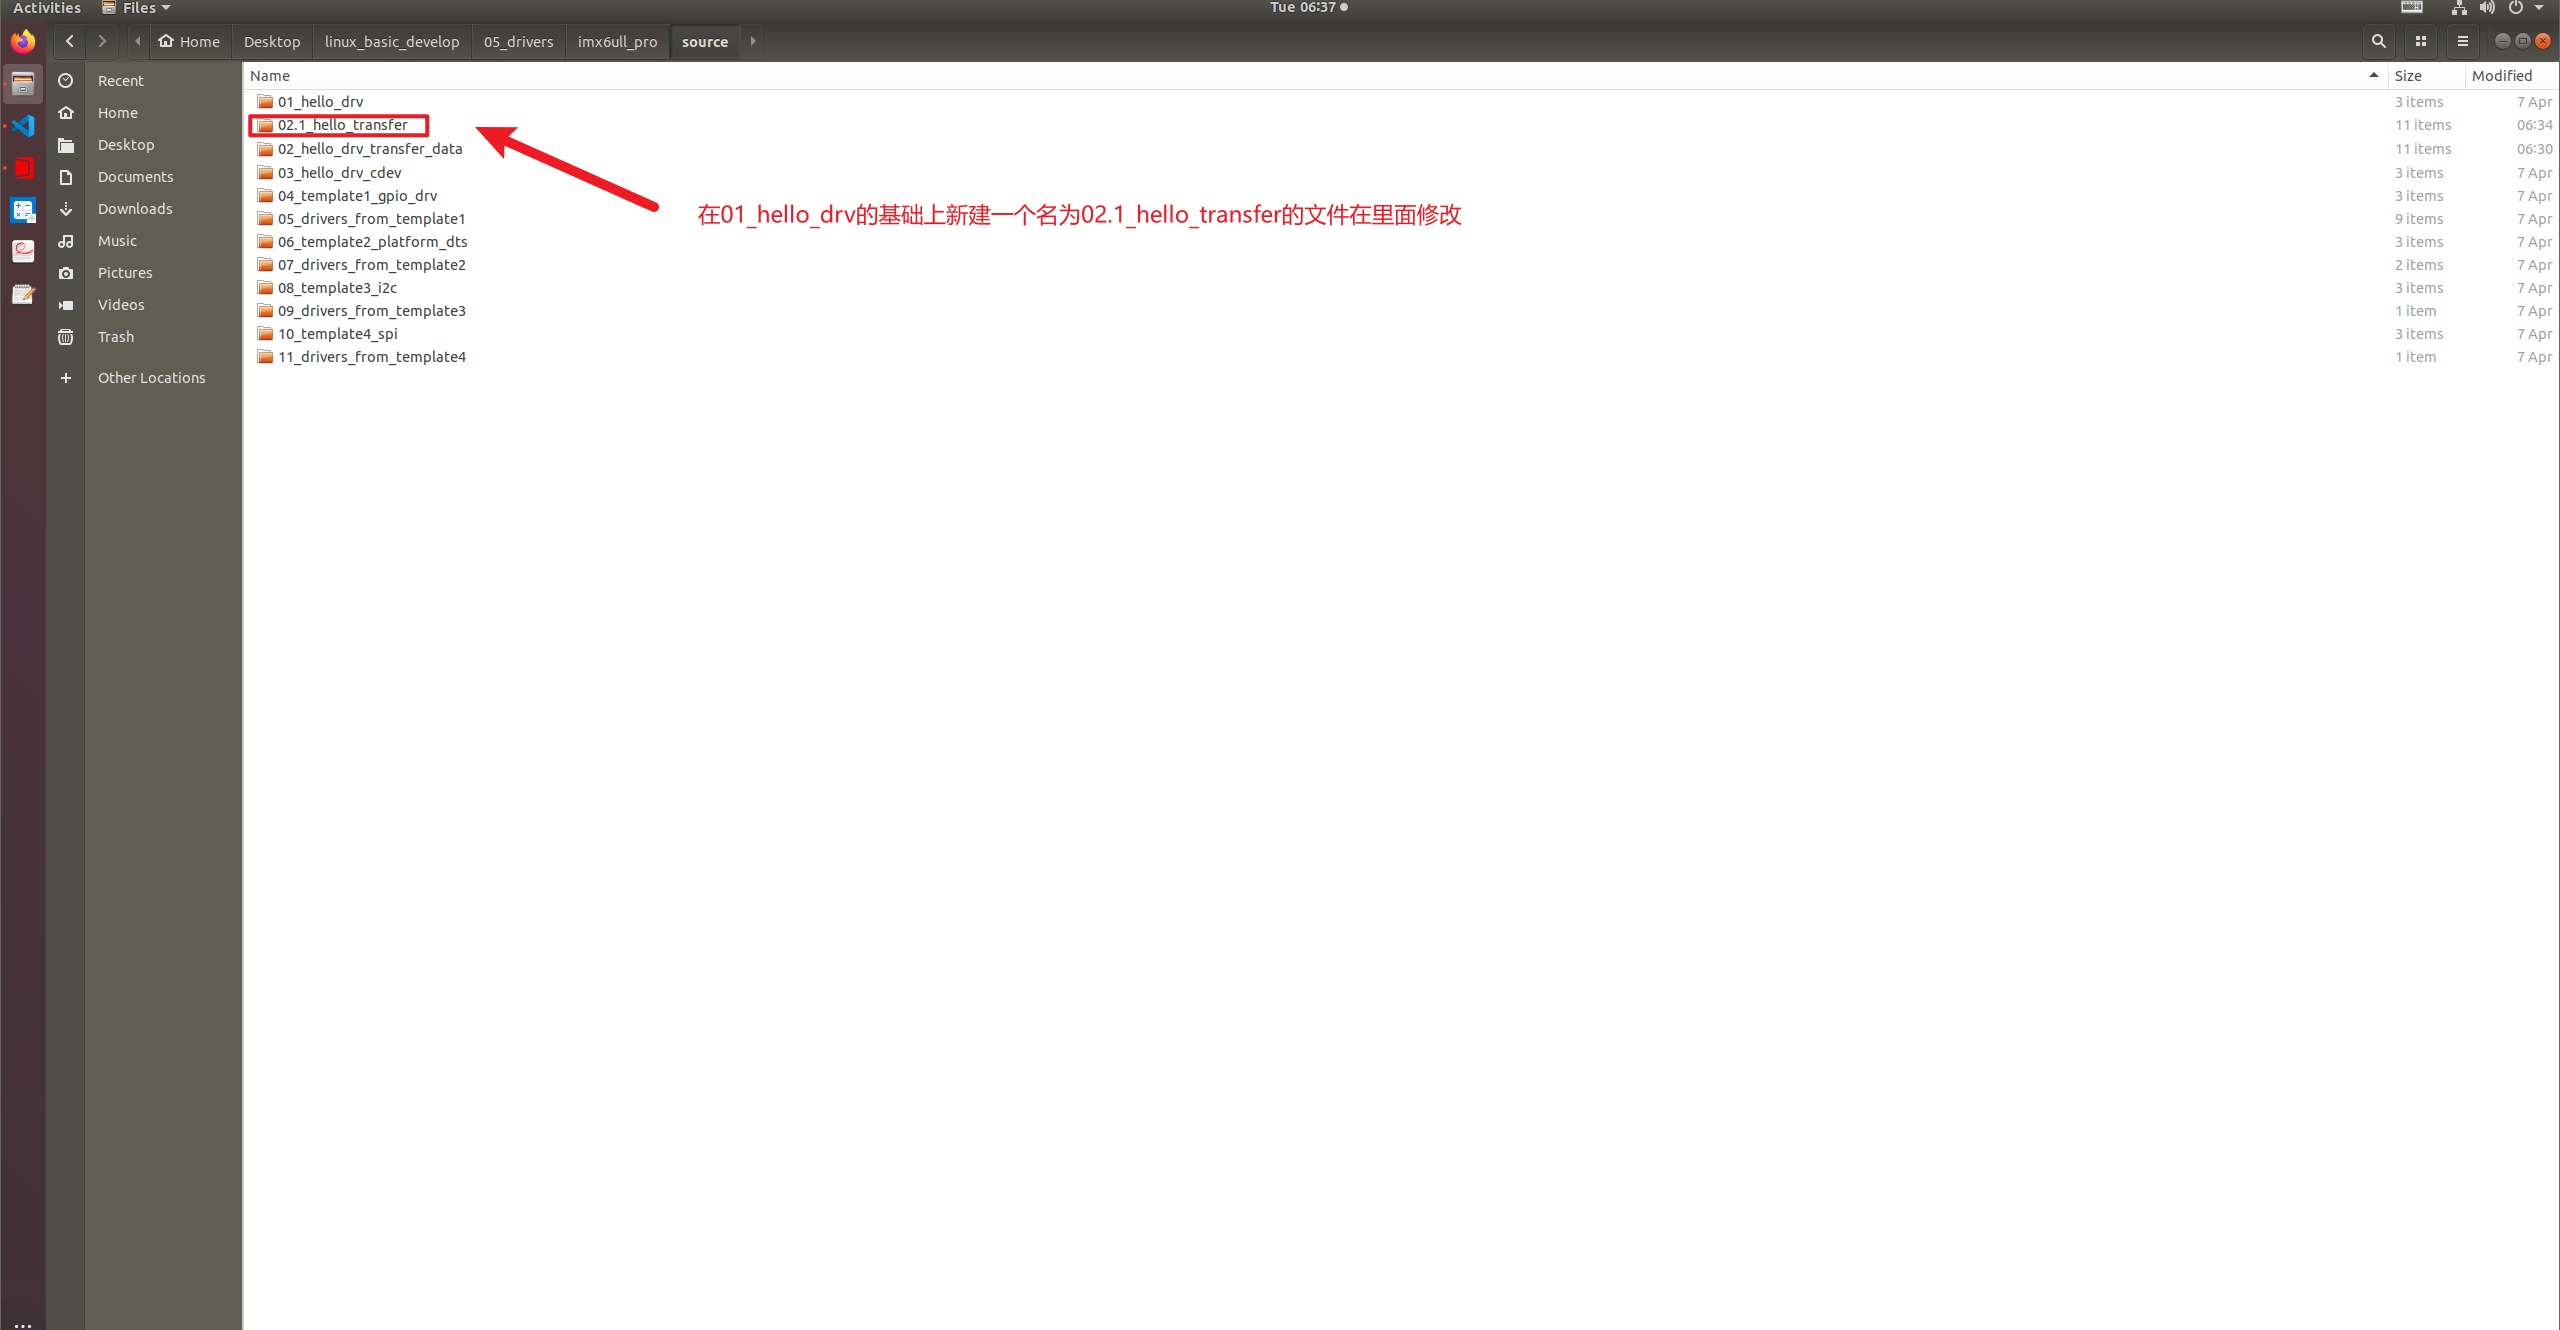
添加02.1_hello_transfer
如果你的vi compile_commands.json内容很少的话
那应该将"cc"改为"arm-buildroot-linux-gnueabihf-gcc"
3.1 完整的驱动源码(带详细注释)
文件:hello_drv.c
c
1#include <linux/module.h>
2#include <linux/fs.h>          // file_operations, register_chrdev
3#include <linux/uaccess.h>     // copy_to_user, copy_from_user
4#include <linux/device.h>      // class_create, device_create
5
6static int major;                    // 主设备号,由内核自动分配
7static unsigned char hello_buf[100]; // 存储 APP 写入的数据
8
9// 当 APP 调用 open("/dev/hello") 时,这个函数会被执行
10static int hello_open(struct inode *node, struct file *filp)
11{
12    printk("%s %s line %d\n", __FILE__, __FUNCTION__, __LINE__);
13    return 0;
14}
15
16// 当 APP 调用 read() 时执行
17static ssize_t hello_read(struct file *filp, char __user *buf,
18                          size_t size, loff_t *offset)
19{
20    unsigned long len = size > 100 ? 100 : size;
21    printk("%s %s line %d\n", __FILE__, __FUNCTION__, __LINE__);
22    // 将内核空间的数据拷贝到用户空间
23    if (copy_to_user(buf, hello_buf, len)) {
24        return -EFAULT;
25    }
26    return len;
27}
28
29// 当 APP 调用 write() 时执行
30static ssize_t hello_write(struct file *filp, const char __user *buf,
31                           size_t size, loff_t *offset)
32{
33    unsigned long len = size > 100 ? 100 : size;
34    printk("%s %s line %d\n", __FILE__, __FUNCTION__, __LINE__);
35    // 将用户空间的数据安全拷贝到内核空间
36    if (copy_from_user(hello_buf, buf, len)) {
37        return -EFAULT;
38    }
39    return len;
40}
41
42// 当 APP 调用 close() 时执行
43static int hello_release(struct inode *node, struct file *filp)
44{
45    printk("%s %s line %d\n", __FILE__, __FUNCTION__, __LINE__);
46    return 0;
47}
48
49// 定义 file_operations 结构体,并初始化各个成员
50static const struct file_operations hello_drv = {
51    .owner   = THIS_MODULE,
52    .open    = hello_open,
53    .read    = hello_read,
54    .write   = hello_write,
55    .release = hello_release,
56};
57
58// 模块加载时执行的入口函数
59static int __init hello_init(void)
60{
61    // 注册字符设备,动态分配主设备号
62    major = register_chrdev(0, "100ask_hello", &hello_drv);
63    if (major < 0) {
64        printk("register_chrdev failed\n");
65        return major;
66    }
67
68    // 创建一个类,用于自动生成设备节点
69    hello_class = class_create(THIS_MODULE, "hello_class");
70    if (IS_ERR(hello_class)) {
71        printk("class_create failed\n");
72        unregister_chrdev(major, "100ask_hello");
73        return PTR_ERR(hello_class);
74    }
75
76    // 在 /dev 下创建设备节点 /dev/hello
77    device_create(hello_class, NULL, MKDEV(major, 0), NULL, "hello");
78    printk("hello driver loaded, major=%d\n", major);
79    return 0;
80}
81
82// 模块卸载时执行的出口函数
83static void __exit hello_exit(void)
84{
85    device_destroy(hello_class, MKDEV(major, 0));
86    class_destroy(hello_class);
87    unregister_chrdev(major, "100ask_hello");
88    printk("hello driver unloaded\n");
89}
90
91module_init(hello_init);
92module_exit(hello_exit);
93MODULE_LICENSE("GPL");
94
代码解释(为什么要这么做):
__init和__exit:告诉内核这些函数只在加载/卸载时使用,执行完后可以释放内存。register_chrdev(0, "name", &fops):第一个参数 0 表示让内核自动分配主设备号。返回的主设备号保存在major中,用于后续创建设备节点。copy_to_user/copy_from_user:绝不能直接使用memcpy拷贝用户空间的数据,因为用户空间可能非法或不在当前进程地址空间。这些函数会做安全检查。IS_ERR判断:class_create失败时返回的不是 NULL,而是一个错误码指针,需要用IS_ERR判断。
3.2 编译驱动 —— Makefile 解析
在同一目录下创建 Makefile:
makefile
1# 指定内核源码路径(根据你的开发板修改)
2KERN_DIR = /home/book/100ask_imx6ull-sdk/Linux-4.9.88
3
4all:
5    make -C $(KERN_DIR) M=$(PWD) modules
6    $(CROSS_COMPILE)gcc -o hello_test hello_test.c
7
8clean:
9    make -C $(KERN_DIR) M=$(PWD) modules clean
10    rm -rf hello_test
11
12obj-m += hello_drv.o
13
解释:
-C $(KERN_DIR):切换到内核源码目录,读取它的顶层 Makefile。M=$(PWD):告诉内核回到当前目录编译模块。obj-m += hello_drv.o:表示将hello_drv.c编译成hello_drv.ko模块。- 最后一行编译测试程序
hello_test.c,使用交叉编译工具链(环境变量已提前设置)。
执行 make 后,会生成 hello_drv.ko 和 hello_test。
3.3 上机测试 —— 从 insmod 到读写 /dev/hello
步骤 1:将文件推送到开发板
bash
1adb push hello_drv.ko /root
2adb push hello_test /root
3
步骤 2:加载驱动
bash
1adb shell
2cd /root
3insmod hello_drv.ko
4
加载成功后,内核会打印 hello driver loaded, major=...。此时可以查看设备节点:
bash
1ls -l /dev/hello   # 应该存在
2cat /proc/devices | grep hello   # 查看主设备号
3
步骤 3:运行测试程序
测试程序 hello_test.c 源码:
c
1#include <sys/types.h>
2#include <sys/stat.h>
3#include <fcntl.h>
4#include <unistd.h>
5#include <stdio.h>
6#include <string.h>
7
8int main(int argc, char **argv)
9{
10    int fd;
11    int len;
12    char buf[100];
13
14    if (argc < 2) {
15        printf("Usage: %s <dev> [string]\n", argv[0]);
16        return -1;
17    }
18
19    fd = open(argv[1], O_RDWR);
20    if (fd < 0) {
21        printf("can not open file %s\n", argv[1]);
22        return -1;
23    }
24
25    if (argc == 3) {
26        // 写操作:将命令行参数写入驱动
27        len = write(fd, argv[2], strlen(argv[2]) + 1);  // +1 包含 '\0'
28        printf("write ret = %d\n", len);
29    } else {
30        // 读操作:从驱动读取之前写入的字符串
31        len = read(fd, buf, 100);
32        buf[99] = '\0';
33        printf("read str : %s\n", buf);
34    }
35
36    close(fd);
37    return 0;
38}
39
执行写操作:
bash
1./hello_test /dev/hello 100ask
2# 输出:write ret = 7
3
执行读操作:
bash
1./hello_test /dev/hello
2# 输出:read str : 100ask
3
步骤 4:查看内核打印信息
在另一个终端(或串口)执行 dmesg | tail,可以看到 hello_open, hello_write, hello_read, hello_release 的打印。
步骤 5:卸载驱动
bash
1rmmod hello_drv
2ls /dev/hello   # 应该已经消失
3
3.4 常见错误与解决方法
| 错误现象 | 可能原因 | 解决方法 |
|---|---|---|
| insmod: ERROR: could not insert module hello_drv.ko: Device or resource busy | 主设备号冲突或已有同名驱动 | 检查 cat /proc/devices,换一个名字或用动态分配 |
| can not open file /dev/hello | 设备节点未自动创建 | 检查 class_create 和 device_create 是否执行成功;手动 mknod /dev/hello c 245 0 临时测试 |
| write ret = -1 | 驱动中的 copy_from_user 失败 | 检查用户空间指针是否有效,确认 len 不超过缓冲区 |
| 编译时 warning: ignoring return value of ‘copy_from_user’ | 未检查返回值 | 应该处理返回值,但初学可忽略 |
⚠️ 特别提醒:如果
register_chrdev忘记写或参数错误,会导致major为 0,device_create失败,最终/dev/hello不会出现。上面的源码中已经修正。
4. 驱动与 APP 的数据传输 —— copy_to/from_user
为什么不能直接 memcpy?
因为用户空间和内核空间是 隔离的。用户进程的虚拟地址在内核中可能没有映射,直接访问会导致 缺页异常 甚至内核崩溃。copy_to_user 和 copy_from_user 会检查地址有效性,并且处理缺页。
使用格式:
c
1unsigned long copy_to_user(void __user *to, const void *from, unsigned long n);
2unsigned long copy_from_user(void *to, const void __user *from, unsigned long n);
3
- 返回值:未能拷贝的字节数。0 表示全部成功,非 0 表示出错。
- 因此正确用法应该检查返回值:
c
1if (copy_to_user(buf, hello_buf, len)) {
2    return -EFAULT;   // 返回错误码
3}
4
5. 驱动提供能力,不提供策略 —— 四种访问方式
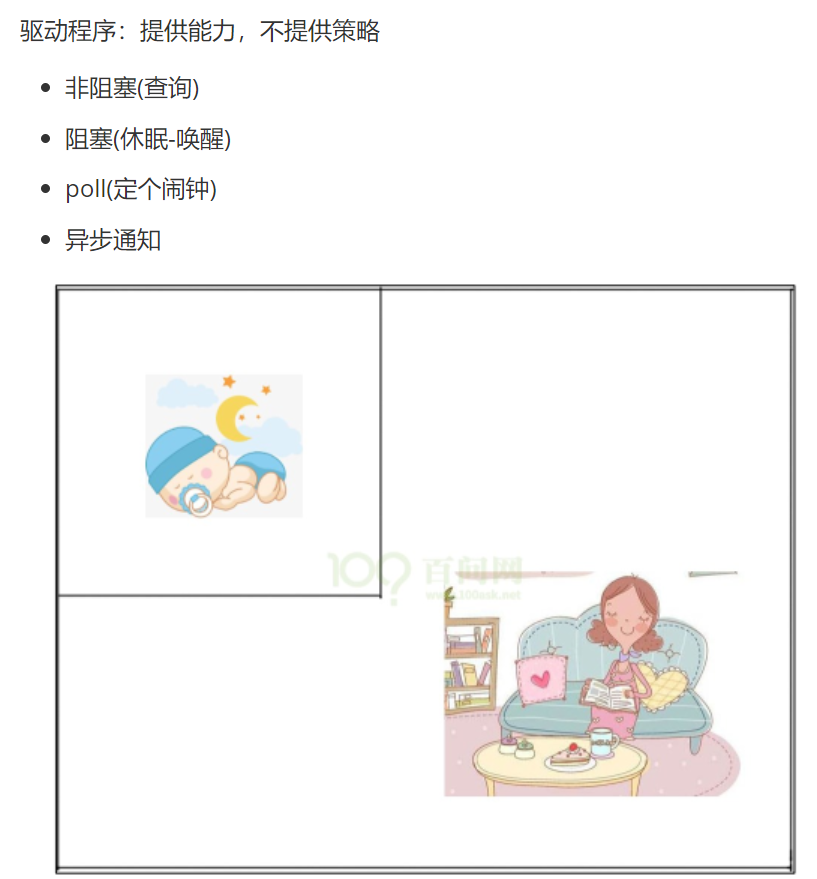
驱动只负责 能不能读写,而 什么时候读写 由 APP 决定。常见的四种访问方式(以读取按键为例):
| 方式 | 生活化类比 | 驱动实现 | APP 行为 |
|---|---|---|---|
| 非阻塞(查询) | 妈妈时不时进房间看孩子醒了没 | read 函数立即返回数据或 -EAGAIN | 循环调用 read,每次不等待 |
| 阻塞(休眠-唤醒) | 妈妈陪孩子睡,醒了才醒 | 没有数据时让进程休眠,中断中唤醒 | read 会一直等待直到有数据 |
| poll(定闹钟) | 妈妈陪睡一会儿,设个闹钟 | 实现 .poll 函数,支持超时 | 调用 poll/select 设定等待时间 |
| 异步通知(信号) | 孩子醒了主动跑出房间喊妈妈 | 在中断中发送 SIGIO 信号 | 注册信号处理函数,无需主动读 |
理解“不提供策略”:驱动不应该规定 APP 必须用哪种方式,而是提供所有可能(非阻塞、阻塞、poll、异步通知),让 APP 根据自己的需求选择。
6. GPIO 子系统 —— 用编号控制引脚
驱动最终要操作硬件引脚。Linux 内核提供了 GPIO 子系统,统一管理所有 GPIO。
6.1 确定 GPIO 编号的方法
方法一:通过 /sys/kernel/debug/gpio 查看
bash
1cat /sys/kernel/debug/gpio
2
输出示例:
text
1gpiochip0: GPIOs 0-31, parent: platform/209c000.gpio, 209c000.gpio:
2 gpio-5   (                    |goodix_ts_int       ) in  hi IRQ
3 gpio-19  (                    |cd                  ) in  hi IRQ
4...
5
方法二:在 /sys/class/gpio 下查看每个 gpiochip 的 label
bash
1ls /sys/class/gpio/gpiochip* -d
2cat /sys/class/gpio/gpiochip0/label   # 得到 "209c000.gpio" 等
3
对于 IMX6ULL,GPIO 编号公式:(bank-1)*32 + pin。例如 GPIO5_3 → (5-1)*32+3 = 131。
6.2 基于 sysfs 操作 GPIO(用户态验证)
不需要写驱动,就可以在命令行操作 GPIO(前提是该引脚没有被占用)。
bash
1# 导出引脚
2echo 131 > /sys/class/gpio/export
3# 设为输出
4echo out > /sys/class/gpio/gpio131/direction
5# 输出高电平
6echo 1 > /sys/class/gpio/gpio131/value
7# 解除导出
8echo 131 > /sys/class/gpio/unexport
9
如果出现 write error: Device or resource busy,说明该引脚已被某个驱动占用。
6.3 GPIO 子系统的内核函数
内核推荐使用 descriptor-based 的新接口(以 gpiod_ 开头):
| 功能 | 新接口 | 旧接口 |
|---|---|---|
| 获取 GPIO | gpiod_get() | gpio_request() |
| 设置方向 | gpiod_direction_input() | gpio_direction_input() |
| 输出值 | gpiod_set_value() | gpio_set_value() |
| 输入值 | gpiod_get_value() | gpio_get_value() |
| 释放 | gpiod_put() | gpio_free() |
通常还需要配合设备树或平台数据来获取 GPIO 描述符。简单的测试可以直接使用旧接口。
7. 中断处理 —— 让驱动响应硬件事件
以按键为例,我们希望按下按键时,驱动程序能立即通知 APP。
7.1 中断申请流程
- 获得中断号:
gpio_to_irq(gpio_num) - 注册中断处理函数:
request_irq(irq, handler, flags, name, dev) - 在中断处理函数中:
- 分辨中断(如果有多个中断源)
- 处理数据(如读取按键值,唤醒等待队列)
- 清除中断(硬件相关)
- 卸载时释放中断:
free_irq(irq, dev)
7.2 按键驱动框架(含定时器防抖)
为什么需要定时器? 机械按键在按下和释放时会产生多个抖动,导致多次中断。用定时器延迟一小段时间,再读取稳定状态。
驱动骨架示例:
c
1#include <linux/interrupt.h>
2#include <linux/gpio.h>
3
4static int gpio_irq;
5static struct timer_list key_timer;
6
7// 定时器回调函数:用于防抖
8static void key_timer_func(struct timer_list *t)
9{
10    int val = gpio_get_value(KEY_GPIO);
11    if (val == 0) { // 按下(假设低电平有效)
12        // 通知 APP(唤醒等待队列,或发送信号)
13    }
14}
15
16// 中断处理函数
17static irqreturn_t key_isr(int irq, void *dev_id)
18{
19    // 修改定时器,延迟 20ms 后执行防抖
20    mod_timer(&key_timer, jiffies + msecs_to_jiffies(20));
21    return IRQ_HANDLED;
22}
23
24static int __init key_init(void)
25{
26    // 申请 GPIO
27    gpio_request(KEY_GPIO, "my_key");
28    gpio_direction_input(KEY_GPIO);
29    // 获得中断号并注册
30    gpio_irq = gpio_to_irq(KEY_GPIO);
31    request_irq(gpio_irq, key_isr, IRQF_TRIGGER_FALLING, "my_key", NULL);
32    // 初始化定时器
33    timer_setup(&key_timer, key_timer_func, 0);
34    return 0;
35}
36
37static void __exit key_exit(void)
38{
39    free_irq(gpio_irq, NULL);
40    gpio_free(KEY_GPIO);
41    del_timer(&key_timer);
42}
43
jiffies是内核的全局时间戳,msecs_to_jiffies(20)将 20 毫秒转换成节拍数。mod_timer会修改定时器的超时时间,如果定时器还未触发,就重新计时。
8. 总结与后续学习建议
通过本文,你已经掌握了:
- ✅ 驱动的基本框架(
file_operations, 注册/注销, 自动创建设备节点) - ✅ 内核与用户空间的数据传输(
copy_to/from_user) - ✅ 四种访问方式的概念
- ✅ GPIO 编号的确定和 sysfs 操作
- ✅ 中断申请与定时器防抖
下一步可以学习:
- 设备树:如何描述 GPIO 和中断资源,让驱动更通用。
- platform 驱动模型:将驱动和设备分离。
- input 子系统:按键、触摸屏等输入设备的统一框架。
- 内核调试技巧:
printk的级别,/sys/kernel/debug,ftrace。
推荐实验:
- 修改 hello 驱动,增加
ioctl方法,实现清空缓冲区功能。 - 写一个完整的按键驱动,支持阻塞和非阻塞读,并用
poll测试。 - 将按键驱动和 LED 驱动结合,实现“按一下开关灯,再按一下关灯”。
🎉 恭喜你完成了 Linux 驱动开发的入门!记住:驱动就是提供能力,不提供策略。多写代码,多读内核源码,你会越来越强大。
《Linux 驱动开发入门:从最简单的 hello 驱动到硬件交互》 是转载文章,点击查看原文。